
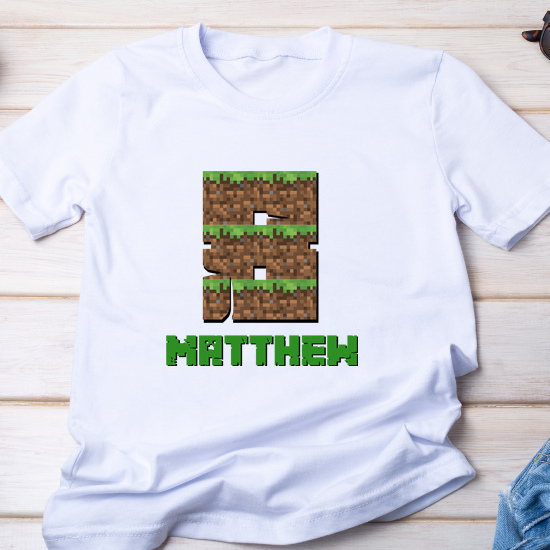
$5 CUSTOM Minecraft Iron on Transfer CODE: PB15
- Print It Party
- Jun 21, 2021
- 2 min read
How to Purchase:
1) Make a note of "Product Reference Code" for this item: PB15
2) Please go to this link "How to Purchase"
Includes:
- Personalized with AGE and Name (images cannot be personalized) Iron On Transfer Files. You can personalize the text with a name or any other text you'd like. Eg. Dad of the Birthday Boy, Dillan's 5th Birthday etc
-Digital design/file only - No physical item will be shipped.
-All digital files/designs are sent for DIY home printing with an inkjet printer and there are "NO REFUNDS" once the files are emailed so please ensure you know how to use and print digital files before purchasing.
PRINTING: (White shirt application recommended)
You can print the designs from your inkjet printer onto the Avery (Light T-shirt heat transfer sheets: 3271, 3275, 8938, 8939, 4271 or Dark T-shirt heat transfer sheets 3279) OR any comparable type of heat transfer sheets which can be purchased at any office supply stores, craft stores, online vendors, Walmart etc.....
SIZE:
Design will be send in PDF file (both flipped and not flipped images) to fit on transfer sheet that is 8.5 x 11". Please read tips for further information below.
How can I make a t-shirt with my image?
Printable DIY Iron on transfers from digital images! They are an easy and an affordable alternative to buying custom shirts. Print images onto iron on transfer paper, from your home computer and create to your hearts desire!
Some important tips to remember:
1. Make sure you purchase the correct iron on transfer paper. There are many types to choose from, including those for light fabric and those for dark fabric. You can purchase iron on transfer sheets at most any craft or retail store.
2. If you are going to iron your transfer onto dark fabric be aware that any part of the image that you don’t cut out will show white on the fabric.
Light fabric transfers will be a bit more forgiving, as the transfer paper is almost transparent, however, I recommend you try to cut it out as close to the design as possible, for best results.
3. All iron on transfer papers have full instructions included with them. All will be a bit different with their instructions. Some will ask you to “mirror” or “flip” your image. I include mirrored images with all of my listings. *Remember to read the instructions. Some papers do not require flipping.
4. If you need to make your image larger or smaller, you can do this on the printer options screen before you print.
5. Practice first! Print your image out onto a plain sheet of paper to make sure it’s the correct size that you want and that all of the image is within the paper area. You also might want to consider doing a small test project on an older piece of fabric so you get the hang out of ironing the transfers.
Follow the directions on the package of transfer paper for best results.


Comments